A few weeks ago I did a repair job on a pair of vintage Dahon folding bikes. One had 16″ wheels and the other, 20″ wheels. Although the concept of a folding bike was intriguing, these two bikes were a bit wobbly and lacked the stiffness and quality components that I was accustomed to in working with touring bikes. However, this whole episode got me contemplating the positive points of folding bicycles in general so I began studying the various offerings and their ride qualities. Well, you don’t get too far down that rabbit hole before stumbling upon the cult of Brompton owners.
The “Brompton” is a British manufactured folding bicycle designed in the 1970’s which has a following of thousands of loyal users. The bike folds down into a very small package which is relatively light weight for a steel framed bicycle. The hinges are stout and stiff and the moving parts are minimal and less than sophisticated and the bike does exactly what it is advertised to do. It rides much like a standard large wheeled bike but can easily be folded up into a 22″ x 21″ x 10″ package for carrying onto planes, boats, trains or elevators. Being the bicycle junkie that I am, I decided to dissect the Brompton to find out what made it tick. At the heart of the bicycle is the venerable and bomb-proof Sturmey-Archer 3 speed internally geared hub. During the turn of the last century Brompton used similar hubs from Sachs (now Sram) for a few years when supplies began to dry up. Both of these hubs have a reputation for longevity and strength. This is just one of many factors that contribute to the Brompton’s excellent resale value. It is not uncommon for ten to fifteen year old bikes to sell on the used market at prices north of $1000 US. Other than tire & brake shoe wear and the occasional nick or scratch, there is not much that can go wrong with a Brompton bike. Add to this the fact that the design has not changed much since the beginning and you can understand why these small bikes hold their value. The Brompton company, like many British outfits, is fairly obsessive about keeping and offering small replacement parts for their bikes. There is also a thriving after-market for Brompton accessories including Rohloff speed hub conversions and electric hub motors. So, armed with the knowledge I had learned about the workings of a Brompton, I set out to build my version of the ultimate travel bike.
First step… acquire a “donor” bike.
A quick search of Ebay and CraigsList will reveal a treasure trove of used Brompton bike listings. Many of these are located in the UK and have hefty shipping costs associated with them. It is not uncommon to add an additional $135US – $175US for shipping to the states and trying to get a bike sent to the US Virgin Islands is next to impossible. I had my eye out for a certain type of listing. Many professional Brompton sellers use multiple close-up photos to highlight their bikes and detailed descriptions of the add-on features. I was looking for a US seller who had no idea what he was doing when it came to reselling a Brompton. I located a listing with one very grainy photo of what appeared to be a clean Brompton for sale in the eastern United States. The description was simply “older 3 speed folding bike, average wear and tear”. I decided to sit back and watch the auction progress. After four days the bidding reached $1000 and I decided it was too rich for my bank account so I let it go. Remarkably, the exact listing showed up a few days later with the same blurry photograph. For some reason the sale did not go through so the seller re-listed the bike. I began scrutinizing the blurry image and could easily see a total of four cables running from the handlebars, two from each side. This could only mean that the bike was actually a 6 speed and not a 3 speed as it was advertised. This is an easy mistake to make because the 2 speeds on the left are usually not marked and the 3 speeds on the right have a clear (1-2-3) marked on the shifter. It was obvious that the seller was unfamiliar with the bike. Either it had been stuck in a closet for some years or just neglected but the owner had forgotten the details of the bike. This auction seemed promising. I waited for 7 days until the last 20 seconds of the auction. The bike had been bid up to $560 but I knew there were buyers in the wings ready to pounce. I bid $950 just to be on the safe side and won the auction at $799. Wahooo!!! Now came the part where I wait for the delivery and hope I was correct in my assessment of the item/seller. The bike arrived and I could not have been happier. It turned out to be a 2003 model which had never seen the light of day. The tires had not a speck of dirt on them and the brake shoes were flawless with even the tiny strip of rubber running down the center still. The bike sported an original Brompton saddle and a Sachs 3 speed hub with the Brompton proprietary 2 speed cog & “derailleur” system (entering Brompton production in May of 2002) which essentially made this a 6 speed bike. The paint job was perfect and a beautiful gloss metallic silver with gloss black fork & rear triangle. Gloss paint jobs are uncommon on more modern Brompton’s which are usually a matt color. The bike also has a 30mm shorter wheelbase, being an earlier build so it folds up a bit smaller. Another added bonus was the discovery of a dynamo generator and Halogen lights which are in perfect working order as well as the original Brompton frame pump. A good value estimate of this bike would be around $1400 so I am very happy with this purchase.
The first step on building the ultimate travel bike was completed.
I had read about and seen various electric hub kits on YouTube that were specially built for the Brompton 16″ front wheel. Most of these operated with a basic thumb throttle and were more of a scooter than a bike. I wanted a true pedelec type system with a torque sensor that would add a level of assist to the riders pedal stroke. I also wanted a motor with enough power to muscle up the hills on St Thomas without burning up. Almost all of the existing hub kits were using a 250 watt motor but I was looking for something closer to 500 watts. Also, many of the existing Brompton kits needed the front forks to be “cold set” out to 110mm from 79mm which was a stretch for an already small set of forks not to mention the change in folding width of the finished E-bike. I wanted a hub motor which would fit between the stock Brompton fork dropouts with no modifications which could weaken the bike. Another prerequisite was to have a temperature gauge in the motor with an automatic shut-off if temps reached overload. I have seen too many electric hub motors fried on the steep slopes of this island and knew there needed to be a fail-safe built into this bike to save users from themselves. All these extra bells & whistles called for a special electronic component to bring them together into an easy to use display.
Grin Technologies of Vancouver BC manufactures and sells a unit called the Cycle Analyst that does just that. They also have put together the perfect Brompton e-bike kit which ticks all the above boxes brilliantly. The kit can be ordered with a THUN bottom bracket torque sensor which can accurately measure rider power output and then apply a level of electric assist from a 500 watt Crystalyte hub motor. One of the major drawbacks of touring with an electric bike are the restrictions on checking lithium-ion batteries with airlines. Even the postal service refuse to ship e-bike batteries. There are a few exceptions and work arounds that Grin Technologies have taken advantage of when creating the new LIGO battery system. These are very small (under 98watt, 2.7ah 36V) sealed battery packs which are legal to fly with when separated. Once you arrive at your destination you simply snap the batteries together in series to get the required battery size for range of distance and then plug them into the bike.
The second step on building the ultimate travel bike was completed.
Changing a flat tire on a Brompton can be challenging with the combination of internally geared hub and mini-derailleur system, not to mention the struggle to mount certain tires onto the small 16″ rims. Add to that the hassle of dealing with a front electric hub motor with its wiring and torque arms and you can see the beauty of a flat-free airless tire. Tannus tires of South Korea manufactures a specialty tire for the Brompton 16×1.25 (349 Rim). These tires are made from a Micro Closed Cell Polymer Resin called Aither and are a solid foam with no tube or air. It is impossible for one of these tires to go flat. They come in various hardness’s which mimic standard tire pressures such as 60psi or 100psi. Tannus tires are guaranteed to last for 5000 miles but users claim anywhere from 6000-8000 miles (depending on the road surfaces). Using Tannus tires on a long tour eliminates the need to carry extra tires, tubes, patch kits or a pump. Not only does this lighten the load quite a bit but the Tannus tires are actually lighter than conventional tire/tube combinations they replace. They even come in an assortment of bright colors. I selected a basic asphalt gray to match the bike.
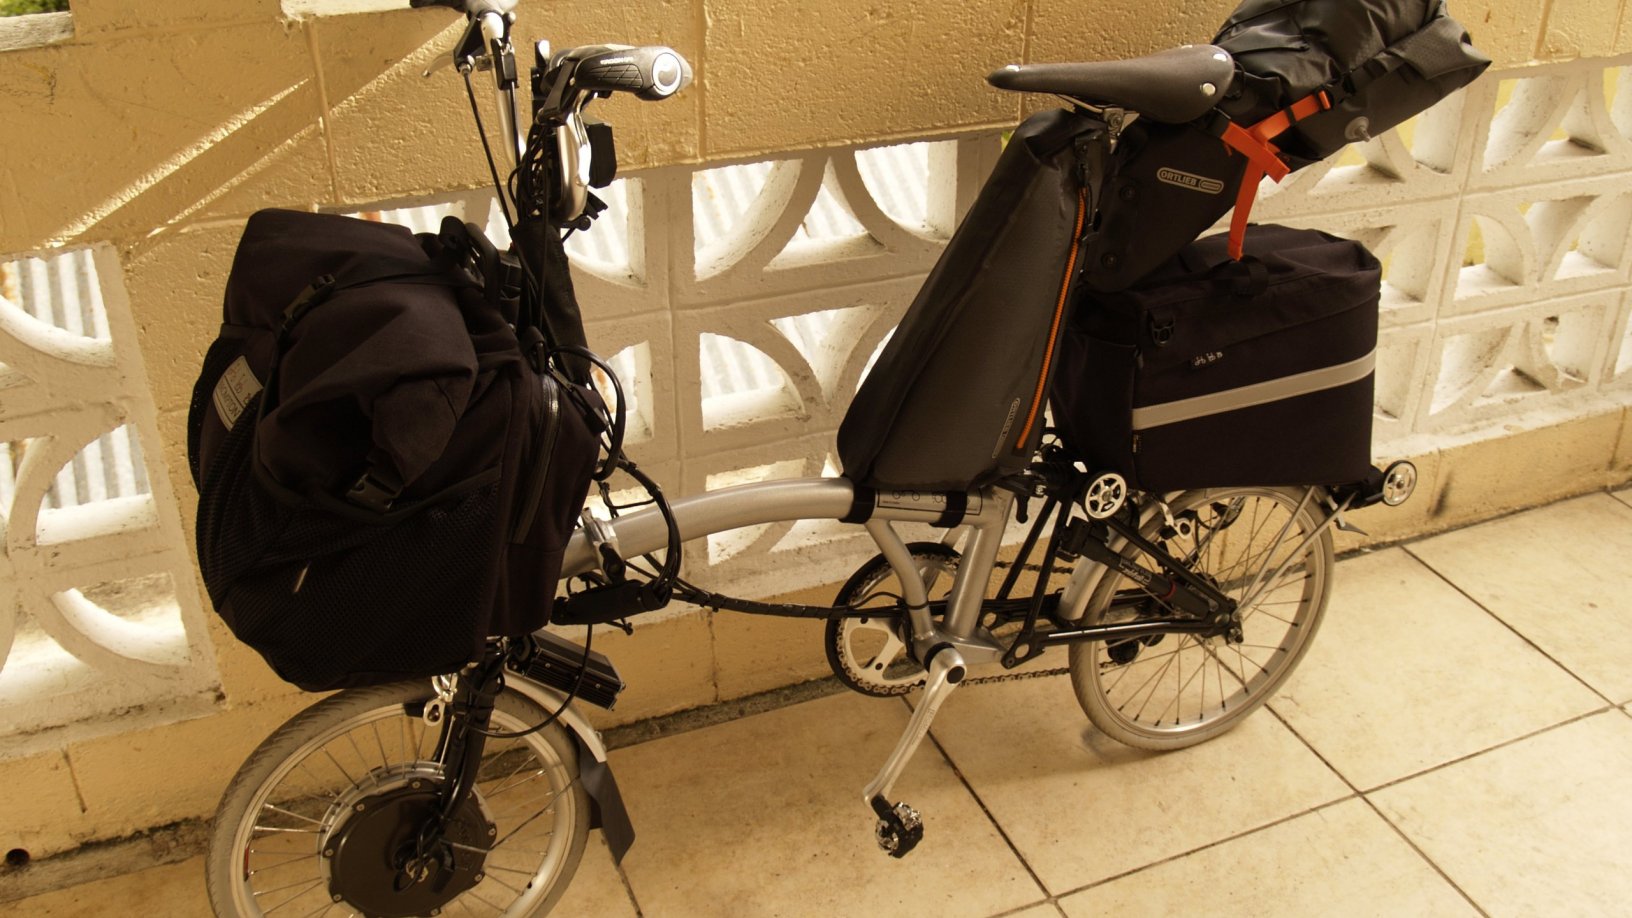
Touring Luggage
Bicycle touring requires some sort of rack & luggage system to carry all the day-to-day camping and survival gear. I dug out all of my touring panniers, rack packs & bar bags and began loading them onto the Brompton in different configurations. I pondered using Ortlieb front panniers on the rear rack of the Brompton but they came awfully close to dragging on the ground. I investigated the unique Brompton Pannier Rack by Kinetics which allows the use of two Ortlieb panniers up front on the Brompton carrier block. Another interesting idea was the Xootr CrossRack seatpost rack, which allows the use of a single large Ortlieb pannier mounted on the Brompton seatpost. These both seemed like solid solutions, however they both involved extra hardware which would need to be removed and packed away when transporting the bike. Soft panniers can be flattened and used as bike padding during transportation but alloy or steel rack systems are harder to pack. Brompton makes a pair of fantastic touring bags which would be the start of my luggage system. The Brompton T-bag is a 31 liter roll-top touring bag which mounts onto the accessory block in front of the steering post. The other bag is called the Rack Sack and attaches to the standard Brompton rack. This bag has a capacity of 16 liters, bringing the total volume of space to 47 liters for the pair. This is still short of my usual requirements of 42 liters (Ortlieb Bike Packer rear panniers) 20 liters (Ortlieb front roller panniers) and 5 liters (Ortlieb Ultimate 5 bar bag) or a total of 67 liters of space. I turned my attention towards the new rack-less bike packing offerings from Ortlieb. The Ortlieb Bike-Packing Seat-Pack at 16.5 liters and the Ortlieb Bike-Packing Frame-Pack at 4 liters would bring my total to 67.5 liters. I would be picking up an additional half a liter of space without needing the heavy steel racks I had grown accustomed to lugging around on my touring bike. Using this system would give me the benefit of the Ortlieb waterproofing plus the ability to scrunch down the lite-weight packs for air travel. This all seemed good on paper, but… would it work in the real world? I quickly ordered the various bags from the least expensive sources I could find and waited patiently for the deliveries.
While I waited for my touring luggage to arrive, I installed a few upgrades to the new Brompton. The old foam grips made way for a pair of Ergon GP2 grips and the basic Brompton padded saddle was replaced with a black Brooks Cambium C-15. I also mounted a new Sturmey-Archer 3-speed SLS30-T Thumbshifter to replace the ancient Torpedo shifter. The Torpedo shifter was in “like new” condition but it just felt flimsy
to me.
The third step on building the ultimate travel bike was completed.
After a long week of waiting, the bicycle luggage arrived and it all fit together perfectly.
I just love it when a plan comes together!
I took the bike out for a fully loaded test run to the top of the island and back down the opposite side. It functioned flawlessly. The motor thermometer only reached 74C and the tiny lite-weight battery pack carried me for over 12 miles which is pretty good for a 5.4ah battery on steep inclines. The only problem I encountered was some heal strike on the Brompton Rack Pack but I was able to eliminate all of it by adjusting my SPD cleats to the two back holes which moved my feet forward on the pedals. After that I actually tried to clip the bag with my heals but could not. As always, I have included photos of the build below.